
The Gold Standard of Teaching Soil Micromorphology begins when students stop treating a microscopic photograph as an automatic picture of an ancient activity. Soil thin sections preserve microstratigraphy, inclusions, pores and mineral fabrics that can help explain how archaeological layers formed and changed, but no individual dark particle or bright crystal is a complete historical interpretation.
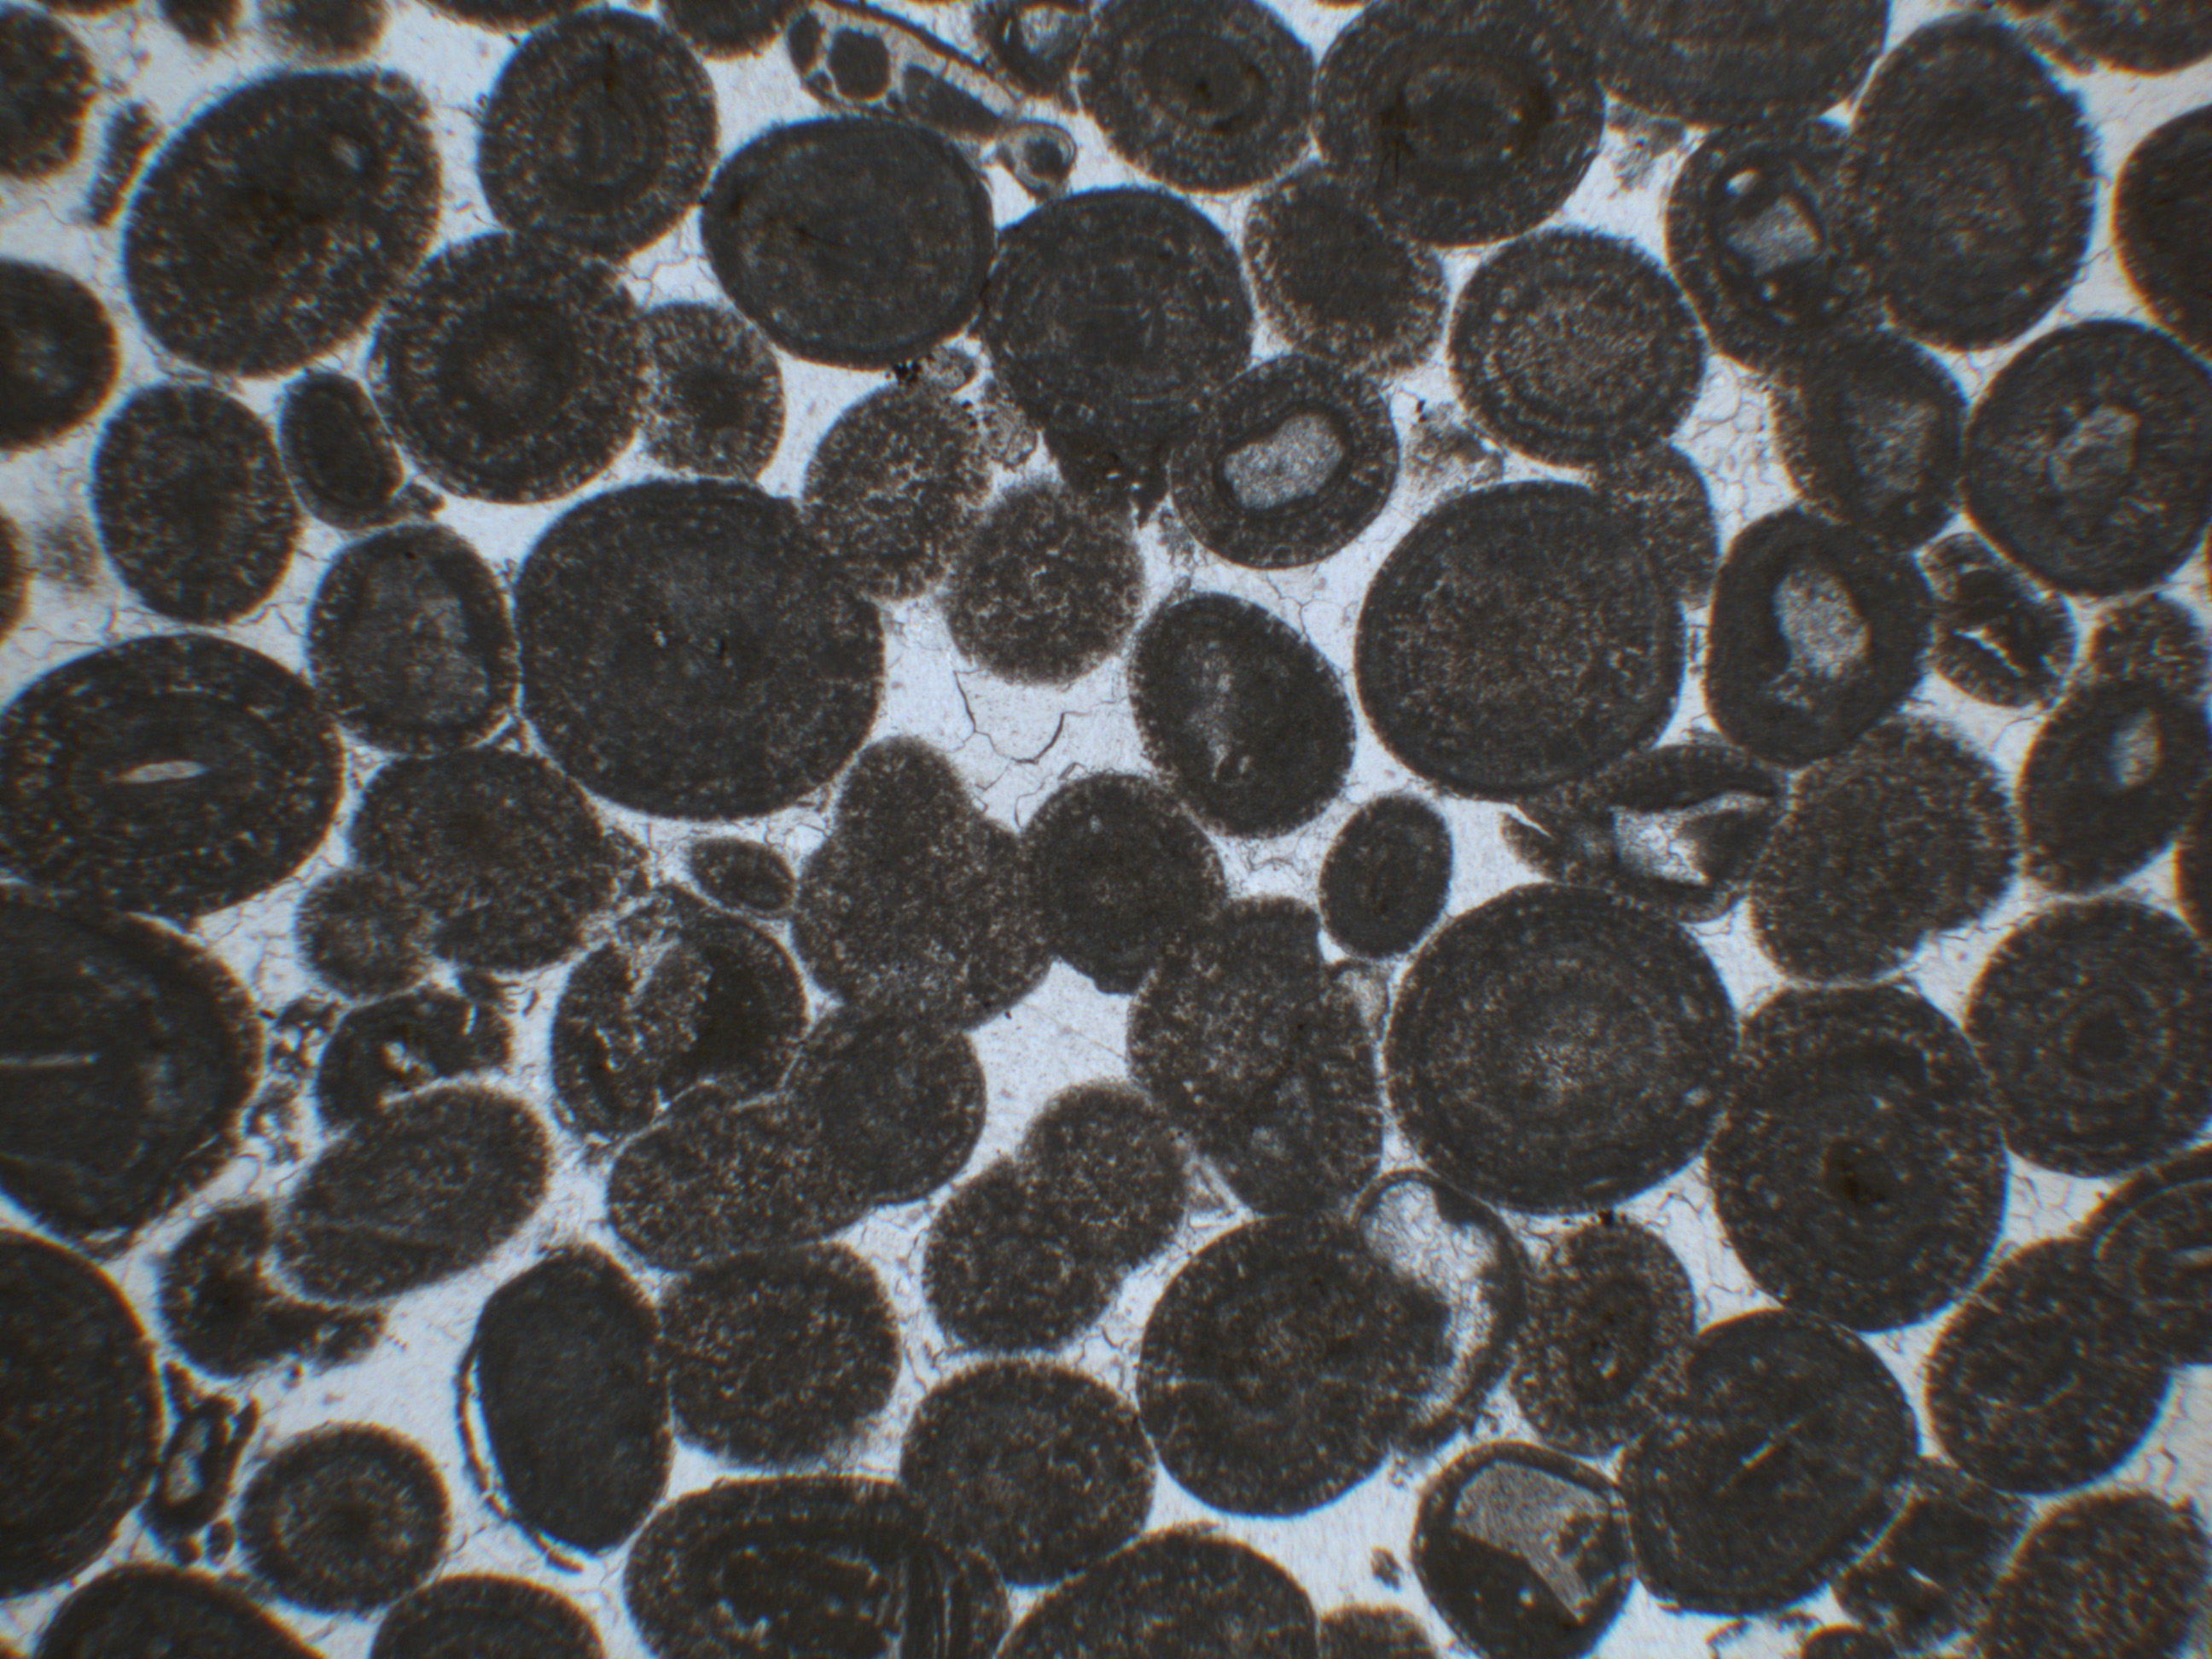
Our running case is an invented archaeological layer, context 310, containing a thin grey lens, dark fragments and microscopic features crossing its boundaries. Students compare an in-situ hearth, dumped ash and later sediment reworking as competing hypotheses. The real featured photograph, by MicroArch, is a soil thin-section micrograph of oolitic gravel from an Iron Age settlement in Switzerland; it is not context 310.
The Historic England Geoarchaeology team, its modern Geoarchaeology guidance and published Asfordby thin-section methods provide specialist research context. This guide applies the eduKate Gold Standard through traceable field samples, microscopy, carefully bounded interpretation and independent transfer.


Find the microstratigraphy question
Choose the sampling, microscope or site-formation problem, or follow the grey-lens evidence from field observation to a cautious interpretation.
Chapter index
Soil blocks, preparation and microscopy · Chapters 1–6
- Start with a layer whose formation is genuinely uncertain
- Link every thin section to its field context
- Distinguish a hand-collected bag from an intact block sample
- Explain resin-impregnated thin sections as prepared evidence
- Teach plane-polarised light before naming minerals
- Use crossed polars to test an optical interpretation
Microstratigraphy and identifiable residues · Chapters 7–11
Formation processes, chronology and reporting · Chapters 12–15
Care and independent transfer · Chapters 16–16
1. Start with a layer whose formation is genuinely uncertain
A fictional archaeological trench reveals a thin grey band between two brown soil layers. The excavation team calls it ‘possible hearth ash’ on its field sheet. A student sees that phrase and writes that ancient residents repeatedly cooked at that spot. That conclusion is stronger than the field description. Soil Micromorphology examines undisturbed or suitably preserved soil and sediment samples at microscopic scales, helping researchers distinguish natural and anthropogenic depositional and post-depositional processes. A light-coloured band can suggest an investigation without independently establishing a hearth.
The original classroom context, called 310, is fictional. Its grey lens is approximately two centimetres thick in the imagined trench and contains scattered dark particles. The real featured image by MicroArch is a separate thin-section micrograph of oolitic limestone gravel from an Iron Age archaeological layer in Switzerland. It does not depict our fictional grey band. Historic England’s Geoarchaeology page describes thin-section microscopy and other soil methods as tools for interpreting the archaeological record. Students must first know what question the microstructure can answer before interpreting a picture.
Back to chapter index · Next chapter
2. Link every thin section to its field context
A microscope image without an oriented field record loses a major part of its archaeological value. The analyst needs to know the site, stratigraphic context, sampling face, orientation, depth or coordinate reference, block position, the layer boundary crossed and any disturbances observed during collection. A thin section can reveal tiny features, but those features cannot be placed confidently into a site history without the larger trench record.
Give the class an invented context sheet: south-facing section, sample M1 crossing the grey band and the brown sediment above, arrow marked ‘top’, and the block’s position recorded on a scaled section drawing. Then remove the orientation arrow and ask how that affects interpretation of inclined particles or overlying coatings. Students should be able to explain why field description and microscopic observation are one evidence chain. Sampling a protected site needs qualified permissions; the classroom can practise from supplied images and mock block drawings rather than disturb real deposits.
Back to chapter index · Next chapter
3. Distinguish a hand-collected bag from an intact block sample
A bulk bag of soil can help with some chemical or particle-size analyses, but it may destroy the spatial arrangement of tiny layers, pores and inclusions needed for micromorphological investigation. An oriented block or monolith can preserve relationships among those features for laboratory preparation. The published Asfordby geoarchaeological research describes resin-impregnated monoliths examined using various microscopic lighting methods.
Ask learners to compare two fictional source packets. Packet A says ‘soil from layer 310’ without a sampling location; Packet B retains an oriented block spanning the interface. Which can reveal whether a microscopic coating formed across the boundary? Packet B is better suited because the spatial relationship survives. Students should not conclude that bulk samples are universally useless: they answer different questions. The teaching objective is choosing a collection form that preserves the evidence needed for a stated question.
Back to chapter index · Next chapter
4. Explain resin-impregnated thin sections as prepared evidence
Archaeological soil thin sections are often prepared from carefully collected blocks that are stabilised and sectioned so transmitted light can reveal microscopic inclusions and fabrics. Preparation itself is a technical transformation, potentially introducing distortions, losses or artefacts. The conventional thickness, mount and illumination depend on laboratory protocol and research needs. An image seen through the microscope is a section through a three-dimensional deposit, not the untouched sediment.
Use diagrams of the specimen block, its preparation and the final flat section rather than giving students a recipe for handling laboratory resins or solvents. Such chemicals and tools require trained facilities and safety controls. Ask what information about the original sample is lost when material is sliced: some three-dimensional continuity, full fragment shape and relationships outside the chosen plane. A clear report preserves block orientation and laboratory processing information so readers know what the two-dimensional image can and cannot demonstrate.
Back to chapter index · Next chapter
5. Teach plane-polarised light before naming minerals
Plane-polarised transmitted light, commonly abbreviated PPL, can show different colours, textures and inclusions in a suitably prepared thin section. The appearance depends on the material, thickness, illumination and microscope settings. A bright particle that seems like ash in one view may be a carbonate or another component when examined with a fuller set of observations. Experienced analysts use a combination of optical properties, reference images and context.
The featured real MicroArch micrograph was taken in plane-polarised light and shows oolitic limestone gravel with an image width reported as about 4.5 mm. Students should read that caption as specific metadata, not invent a different archaeological interpretation from a pale circular grain. Ask them to separate visible shape, brightness and particle relationships from a material identification supported by the original photographer’s description. A micrograph is helpful when the source and lighting mode remain attached to it.
Back to chapter index · Next chapter
6. Use crossed polars to test an optical interpretation
Cross-polarised light (XPL) changes how certain minerals appear because birefringent materials interact with the illumination. This can help analysts distinguish mineral phases and observe fabrics, but the method is not a magical detector of human occupation. Some substances remain dark or appear differently depending on orientation. Interpretation often draws on complementary PPL and XPL observations rather than only a single attractive colour image.
Present two labelled, permissioned images of a suitable known teaching sample under different illumination modes. Ask learners which visual properties change and what remains spatially fixed. They should not call every bright crystal human-made or every black region charcoal. The Historic England laboratory description identifies polarised microscopy as a principal micromorphological method and distinguishes it from other mineralogical approaches. The crucial skill is understanding what the observation mode allows before attaching process claims.
Back to chapter index · Next chapter
7. Identify microstratigraphy as spatial relationships among small layers
Macroscopic excavation layers can contain several microscopic laminations formed during separate events. A two-centimetre grey band may contain fine ash-like material, small mineral lenses and compacted interfaces rather than one uniform deposit. Conversely, bioturbation can mix or blur originally distinct layers. Microstratigraphy helps investigate formation processes at a scale below what the field eye could reliably separate.
Give pupils a fictional diagram with five micro-laminae and ask them to describe boundaries, orientation, thickness and inclusions before labelling each event. One layer contains angular charcoal-like particles; another has light mineral material and a third shows coatings crossing an earlier boundary. Those are observations or preliminary identifications, not proof of three successive hearths. A historical sequence is an interpretation that must address depositional processes and later alteration.
Back to chapter index · Next chapter
8. Use pores and fabric as evidence rather than decoration
Soil microstructure includes voids, aggregates, particle arrangement and features formed by natural or human-influenced processes. Planar voids, channels and compaction fabrics can be relevant to trampling or soil development, but their meanings depend on context. A network of channels might relate to roots, soil fauna or later disturbance rather than ancient construction. Pores are not empty spaces to ignore: their form and distribution can illuminate the history of the deposit.
Ask learners to distinguish a fissure running through multiple layers from a single bounded feature within one layer. Which likely postdates which, under the stipulated geometry? They can use crosscutting reasoning while stating that a micrograph’s two-dimensional view may not capture full three-dimensional continuity. The skill connects Soil Micromorphology to Geoarchaeology but focuses specifically on microscopic spatial relationships.
Back to chapter index · Next chapter
9. Recognise ash, charcoal and heated residues cautiously
Archaeological ash may contain characteristic mineral phases and plant-derived residues, while charcoal and other dark particles can derive from several burning or redepositional processes. A grey layer with black flecks may be a primary hearth deposit, swept-out fuel ash, flood-transported charcoal or later contamination. Scientific identification requires texture, inclusions, mineralogy, stratigraphy and relevant comparisons, not colour alone.
Historic England’s recent Geoarchaeology guidance describes how microscopic ash residues can remain detectable when not visible at the field scale. Give a fictitious sample containing calcitic fine material and dark fragments. Ask which observations would strengthen a hearth hypothesis and which could indicate secondary dumping. The correct inference may be ‘burnt material present in a deposit’ without asserting that fire was lit at the exact sampling point.
Back to chapter index · Next chapter
10. Read phytoliths and other biological microremains with limits
Phytoliths are microscopic silica bodies formed in some plant tissues and can survive after other parts of a plant have decayed or burned. They may be useful evidence of vegetation, fuel, bedding or dung, but their taxonomic and activity interpretations require suitable references. A single phytolith is not a direct identification of a particular crop or proof that a household burned a specific plant at that spot.
Create an imagined thin section containing plant microremains within fine ashy sediment. Students describe their position relative to charcoal and other layers. A hypothesis about fuel use could be compared with nearby archaeological macroplant remains or documented experimental residues. The teacher should explain why phytolith evidence and pollen evidence are not interchangeable: they are produced, moved and preserved through different mechanisms. Micromorphology uses spatial context to add value rather than replacing specialist plant identification.
Back to chapter index · Next chapter
11. Distinguish faecal, chemical and biological pedofeatures
Soil micromorphology may reveal coprolitic material, faecal spherulites, calcite coatings, excremental aggregates and other pedofeatures whose interpretation depends on composition, form and context. Some can be connected to animal activity or processes of soil formation, but look-alike particles and post-depositional transformations complicate identification. An attractive crystal ring should not be called sheep dung merely because the excavator hopes to identify a pen.
Use documented examples from Engaruka micromorphological research, which discusses calcitic coatings and excremental pedofeatures in their landscape context. Ask what additional chemical, archaeological and botanical evidence supports the interpretation. A student who can distinguish a described microfeature from a historic animal-management claim has learned a crucial disciplinary boundary.
Back to chapter index · Next chapter
12. Investigate clay coatings, moisture and soil development
Fine clay coatings and other pedogenic features can indicate processes such as illuviation, repeated wetting and drying or longer-term soil development under suitable conditions. They may form after an archaeological deposit was laid down. Consequently, the microscopic fabric observed today can include both original depositional structure and subsequent soil alteration. A grey lens may not preserve all its original physical characteristics unchanged.
Give students a fictional sequence where thin coatings extend into a void cutting an earlier layer. Ask which events may precede or follow the coating under the diagram’s stipulated relationship. The chronology should remain relative unless independent dating evidence exists. Students need to say whether a feature records deposition, subsequent pedogenesis or a more uncertain mixture. This avoids the mistake of treating every microscopic structure as an action performed by the historic occupants.
Back to chapter index · Next chapter
13. Compare anthropogenic compaction with natural restructuring
Repeated human movement can contribute to soil compaction and distinctive microfabric, but natural compression, animal activity, water movement and later disturbance can produce some similar effects. A compacted microscopic layer near an ancient doorway might support a working-surface hypothesis when paired with the spatial context of architecture and artefacts. It cannot by itself prove exactly how many people passed through that point.
Supply a fictional floor context with fine planar voids and horizontal particle alignment. Ask pupils to identify candidate evidence of trampling, then introduce a later animal-burrow feature that cuts across the deposit. Which patterns might relate to different formation periods? The class should use a comparison sample from an area without the suspected floor where possible. A good field report states the strength of each line of evidence and avoids a categorical ‘this is a walkway’ based solely on one attractive microscope frame.
Back to chapter index · Next chapter
14. Connect microfeatures with dating and source formation
A radiocarbon result on a charcoal particle dates the carbon in that specimen under relevant assumptions; it need not directly date the moment that all surrounding sediment accumulated. An old piece of charcoal can be moved into a younger deposit. A microstratigraphic layer that looks continuous may also include later burrows or reworked material. Scientific dates require clear association between sampled material and the event being investigated.
Give a fictional grey band with charcoal dated earlier than a pottery fragment in the layer above. Ask whether the charcoal proves the grey band was a primary hearth made exactly in that earlier year. It does not, particularly if the material was redeposited. Microanalysis can help evaluate whether charcoal sits within an intact primary ash lamination or a transported matrix, but uncertainty may remain. This is why dating and micromorphology complement each other rather than substitute for a transparent source history.
Back to chapter index · Next chapter
15. Report microscopic observations separately from a formation model
A strong micromorphological report should identify the site, sample, orientation, preparation and observation modes, then describe microstructure, voids, inclusions, coatings and boundaries before offering a site-formation interpretation. Photomicrographs need scale bars, lighting-mode labels and appropriate caption detail. A single selected frame should not be presented as a representative picture of the entire deposit without supporting sampling and documentation.
Ask students to write two paragraphs about the fictional context 310. First list observations: fine grey lamination, charcoal-like particles, mineral inclusions and later void coatings. Then consider formation models: in-situ burning, dumped fuel waste or sediment reworking, noting which observations favour or weaken each. Compare their account with an unqualified claim that ‘the inhabitants cooked here every night’. The latter asserts frequency and behaviour not established by the hypothetical microsection.
Back to chapter index · Next chapter
16. Protect the source and transfer to another deposit
Oriented sample collection may damage an archaeological profile, and thin-section preparation requires specialist equipment and sometimes hazardous materials. Work on protected sites needs archaeological authorisation, and real microscope work should be conducted through properly trained facilities. The school need not create genuine resin blocks to teach the scientific reasoning: licensed reference micrographs, non-hazardous analogues and source-linked diagrams can support a robust lesson.
The final task uses an unfamiliar invented wetland-site block with a sand lens, compacted zone, plant fragments and root channels. Students must explain which observations could indicate flood deposition, trampling or soil development, describe how a representative sample should be documented and identify an independent test. Strong work preserves the difference between microfeature, process hypothesis, layer formation and historical action. That is the gold standard of teaching Soil Micromorphology.
Worked micromorphology report: a grey lens may have several formation histories
This invented source packet models an oriented thin section spanning context 310 and its upper boundary. Descriptions are classroom observations and deliberately provisional identifications. No statement refers to the real featured Swiss micrograph.
| Fictional observed feature | One possible interpretation | Important competing explanation or check |
|---|---|---|
| Grey fine-grained lamination | Ash-like residue | Check carbonate or sediment source; colour alone is insufficient |
| Small dark angular fragments | Possible charcoal from burning | Verify material identity and whether fragments were transported |
| Subparallel planar voids | Possible compression or trampling | Compare natural compaction, later stress and spatial context |
| Fine coatings lining voids | Potential soil development after deposition | Specialist assessment of clay and carbonate features |
| Channels cutting two laminations | Possible later root or soil-fauna activity | Evaluate crosscutting relationships and morphology |
First interpretation: A fire-related deposit may be present, but the fictional observations do not establish a hearth burned in situ. The fragments could have been dumped or reworked, and the coatings may reflect changes after deposition. Second interpretation: fine layers and planar pores may warrant a trampling hypothesis, but the evidence does not count footsteps or prove a fixed floor. The purpose is to teach which additional field, optical or comparative evidence would distinguish candidate histories.
Extended laboratory: one small sample may conceal a larger site difference
Now introduce a second fictitious block from the same grey layer, two metres away. It contains a relatively continuous mineral band but far fewer charcoal-like particles. One pupil declares the first block wrong, while another insists that every square metre must have had an ancient fire. Both claims overreach. Microstratigraphy can vary laterally within a depositional unit because a residue was distributed unevenly, because later processes altered it or because the excavated units combine several formation events. The class should inspect the field section, sample positions, boundaries and any associated artefacts before deciding whether the blocks are directly comparable.
Ask students to prepare a sampling plan that would distinguish a local in-situ feature from redeposited material. One approach could compare oriented samples from the grey zone and appropriate adjacent control layers, with specialist guidance. The goal is not to extract unlimited blocks from a protected site, but to state which parts of the profile need representation and why. If the team cannot sample, a defensible research proposal can still identify the missing evidence and the appropriate professional approvals.
Four lessons from field profile to microscale explanation
- Lesson 1 — Context: read a field section, label an oriented block and distinguish undisturbed micromorphology from bulk soil sampling.
- Lesson 2 — Observation: compare PPL and XPL descriptions, pore patterns, inclusions and microscopic boundaries.
- Lesson 3 — Interpretation: weigh in-situ hearth, dumped ash, trampling and later soil development without overclaiming dates or actions.
- Lesson 4 — Transfer: assess a wetland deposit with a silt lens, burrow and compacted horizon, preserving each observation and uncertainty.
Advanced microscopy interpretation: a microfeature is not an entire event
In a fictional thin section taken across context 310, one observer sees fine grey material with dark angular grains. Another observer notes clay-like coatings inside channels crossing the same layer. If the first observer says ‘hearth’ and the second says ‘soil development’, they need not be arguing about the same phase of formation. A deposit may have formed through one event and later been altered by water movement, roots, soil fauna or other processes. Students should construct a provisional event sequence: deposition of the observed micro-laminae, possible compaction or mixing, development of later voids and any coatings that cross boundaries. The order must be based on observable relationships, not simply the preferred household story.
Now give the class a second imaginary photomicrograph with the same general grey tone but without comparable charcoal-like fragments. They should not infer that one is a hearth and one is not from colour alone. Ask which optical properties, references, sample controls and field notes would distinguish mineral composition, source of the sediment and depositional behaviour. Thin-section interpretation can support a particular model but rarely excludes every competing model from one frame. The quality of a report comes from showing how the micro-observations test each process, rather than using a technical term as a substitute for proof.
Microstratigraphic rubric: keep five research layers separate
| Evidence layer | Required student statement | Common overclaim |
|---|---|---|
| Field context | Site, layer, block orientation, sample location | Every part of the trench has the same microscopic fabric |
| Prepared section | Preparation and observation modes, scale and limits | The image is a direct untouched view of the deposit |
| Descriptive microscopy | Voids, inclusions, coatings and observed boundaries | Dark grain automatically equals charcoal from a hearth |
| Formation interpretation | At least two plausible depositional and post-depositional models | One microfeature proves exactly one human activity |
| Corroboration | Relevant stratigraphy, comparative samples and laboratory evidence | The model is conclusively dated by its appearance |
The transfer test is to exchange the orientation and context cards of two otherwise similar photographs. If a student’s written interpretation remains unchanged despite the new sample provenance, the student may have memorised an image label instead of understanding archaeological microanalysis. Invite them to revisit the field section, describe which relationships are now uncertain and propose the next check that would make the competing interpretations distinguishable. This practice reinforces a central first principle: microscopic clarity does not eliminate contextual uncertainty.
Frequently asked questions about Soil Micromorphology
Does a grey sediment layer automatically indicate a hearth?
No. Colour and dark fragments may derive from different deposits, materials or post-depositional processes.
Can a soil thin section show separate events invisible to the excavator?
It can reveal fine structures below field resolution, but their origins still require interpretation and context.
What is the difference between PPL and XPL?
They are different polarised-light observation modes that reveal complementary optical properties in a prepared thin section.
Does a charcoal date necessarily date a surrounding floor?
No. Material can be older than its final deposit, and association with the target event must be investigated.
Can students make actual ancient soil thin sections themselves?
Professional sample preparation and site permissions are required. Use licensed imagery and non-hazardous modern analogues for class.
Micromorphological methods and published thin sections
- Historic England: Geoarchaeology and Soil Micromorphology
- Historic England: Geoarchaeology—Earth Sciences in Archaeological Records
- Cambridge: Applied Soils and Micromorphology in Archaeology
- Cambridge: Asfordby Monolith Sampling and Microscopy
- Cambridge: Engaruka Soil Microfeatures and Depositional History
- MicroArch Swiss Thin-Section Photograph (CC BY-SA 4.0)
Related eduKate field and laboratory studies
- Teaching Geoarchaeology | Site Formation and Earth History
- Teaching Archaeology | Stratigraphy and Material Evidence
- Teaching Archaeobotany | Charred Plant Evidence
- Teaching Palynology | Pollen and Vegetation Records
- Teaching Conservation Science | Materials and Evidence
- Teaching Earth Science | Rocks and Time
- The Gold Standard master hub
The gold standard of teaching Soil Micromorphology is the ability to connect an oriented field sample with what a thin section actually shows, distinguish microfeatures from proposed formation processes, and produce a site history that acknowledges reworking, soil development, material limitations and independent evidence.